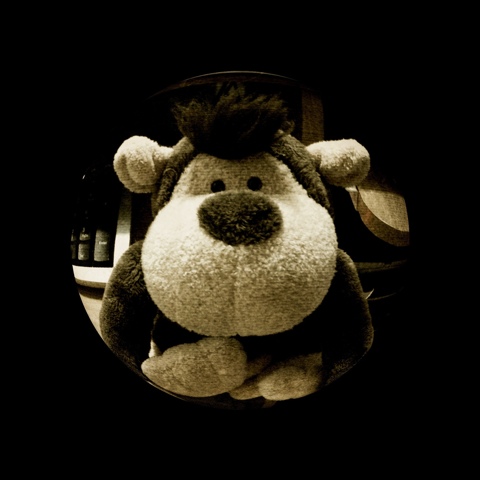
Our Levitation Photography tutorial will show you how levitation is done. Today we will be using Hugo Wolf's leap of faith example. This will be a simple tutorial, the other picture with Jolly Rosa levitating an apple is more complicated as it involves levitation of more than one object (i.e. the apple and rosa)
To do levitation photography, you can always throw your subject into the air and take the picture. But we classify that as Leisure Diving, which we are also doing for our nici plush. Levitation photography is more complicated than that. Before we can continue, you need:
♥ A decent camera to take convincing levitation photos
♥ Basic Photoshop skills to understand half of what we're saying
Tools required for Levitation Photography

1. A camera that can manual focus and manual exposure. You can use a camera without manual control over focus and exposure but the result levitation photograph might not look real enough. Of course, you can always use whatever current camera you have. We use a Nikon DSLR camera for our levitation photography. Very few compact digital cameras offer full manual control. If you think a DSLR camera is too bulky, you should at least try a Nikon D3100, it is extremely lightweight, small and you will be blown away by the stunning pictures it takes. D3100 is the best beginner DSLR camera you can get right now, Canon hasn't come up with anything that can beat Nikon at the same budget range. We do not own the Nikon D3100 (Pictured: a Nikon D70). If you want to go for the compact camera route, definitely the Canon S95 hands down, or a Panasonic LX-5 or Olympus XZ-1. A camera with full manual control is preferable because Levitation Photography requires you to take 3 pictures of your subject using the same exposure and same focus. We will explain it further below.

2. You will need a tripod, any normal cheapo tripod will work as long as it balances itself nicely on the ground. If you don't have a tripod, then put your camera on a stool or table, whichever works for you.
3. You need a photo editing program, the best you can get and of course we are talking about Adobe Photoshop. We will be using Adobe Photoshop CS5 for our Levitation Photography Tutorial.
4. You need a model for your levitation photography. A cute one, like Hugo Wolf for example! ^^
5. You need all kinds of support structure to support your model for levitating. It can be anything! A box, a peanut butter bottle, a toilet paper roll, a photo frame, an ironing board. Whatever you can get your hands on.
Before we start, there are some things you need to ponder about for levitation photography. First you need to have a theme, you should know what kind of levitation you want to create before you can set up all your gear. Then only you can start looking for all kinds of support structure that fits the levitation photograph you are trying to create.
Levitation Photography Tutorial (simple)
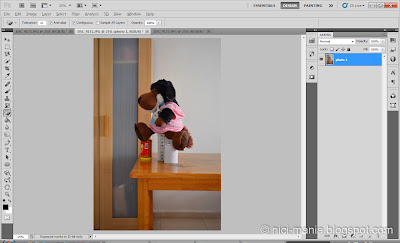
1. Once you have all the above, you can start your levitation. As we mentioned you are required to take
3 pictures. First take a picture of your levitation subject with all the support structure. Manually focus and set the exposure of your camera for the picture. Load the picture into Photoshop and name it
photo 1.
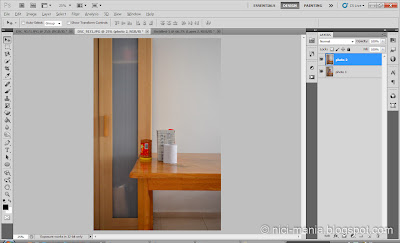
2. Next, take away your levitation model (Hugo Wolf here) and use the same exposure and focus on your camera to take the second picture. Load the picture into Photoshop and name it
photo 2 and lay it above
photo 1.
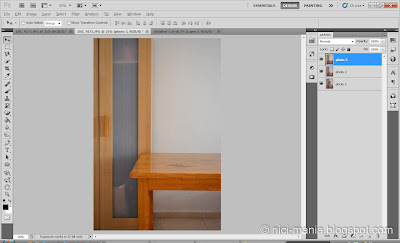
3. Lastly, remove all the support structure to take the third picture in the same position. Load this picture into Photoshop and name it
photo 3.
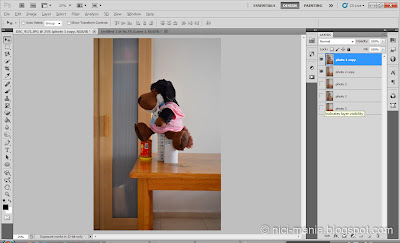
4. Now rearrange the pictures with
photo 3 at the bottom, ascending with
photo 1 and then
photo 2. Than make duplicate copies (Ctrl+J) of
photo 1 and
2. Lay
photo 1 copy at the top and
photo 2 copy right below. Hide the rest of the photos.
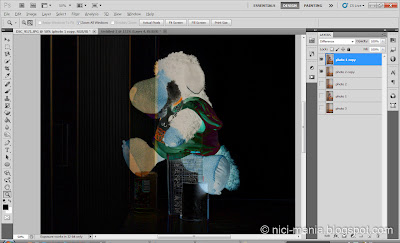
5. On
photo 1, set the layers to Difference. You can clearly see the outline of your levitation model (Hugo Wolf) which you need to outline with a magic lasso (L). You can ignore steps 4 & 5 if you have extremely steady hands and eyes for outlining your subject. Now merge photo 1 & 2 copy (Ctrl+E).
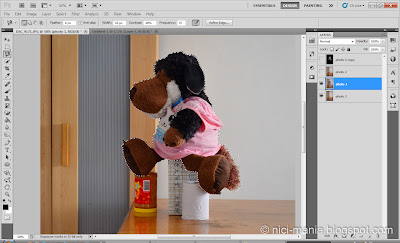
6. Then start outlining your levitation model with the magic lasso tool. Once you have outlined your levitation subject, you can hide or delete the Difference layer. Reveal only
photo 1 and
photo 3.
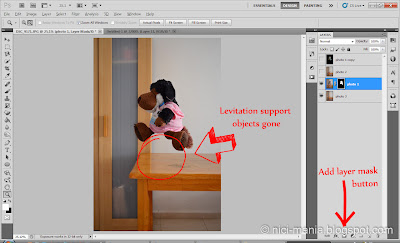
7. Now click on
photo 1 and add Layer Mask to it. You can instantly see the levitation support objects disappear. That's all! Tidy up your picture by using a tiny black paint brush on the Layer Mask to clean up the legs part where some of the levitation supports are still visible. Then I will usually use a large white paint brush on the Layer Mask to paint out the fur outline of my levitation model. Because of Hugo Wolf's plush, outlining with magic lasso (step 5) will make Hugo Wolf look very unnatural. Using a white paint brush on the Layer Mask will make Hugo Wolf look more natural, or else it will look like you pasted a picture of Hugo Wolf on the background. This part is only for people like us who do levitation photography on a furry plush. I also use the white paint brush on the Layer Mask to reveal the shadow of the levitation subject, for example the shadow of the apple and Jolly Rosa in that particular picture. Save your picture in jpg or any format you like.
You can make your levitation photograph look more omph by adding some vignetting and editing the colors. Those are the standard things to do in Photoshop.
Hope you enjoyed the simple version of our levitation photography tutorial. Now go have fun making your NICI plush fly! Comment or drop us an email if you need any help or you have any questions regarding levitation. We are always pleased to help!
Levitation Photography Tutorial - The JUMP method
Well, you can always jump for your levitation photograph. If you searched for levitation photography on the internet, you'd definitely seen Natsumi Hayashi, the levitating girl from Tokyo. She jumped all her levitation photos. No Photoshop editing is required and you only need to take one photograph instead of 3. You can easily do the jump levitation photography alone, all you need is:
1. A camera with self timer or a remote trigger.
2. A tripod.
3. A cushion or soft landing to break your fall.
4. Good patience to jump and fall many times to get the perfect levitation photo.
5. Brightly lit locations like daytime outdoors or indoor with very good lighting.
Here's an example of our levitation photograph using the jump method. NICI Lion is trying to jump back into the drawer. He took more than 20 attempts to finally get this picture with many times missing the cushion below and hitting the floor. Not the best photo but we ran out of patience.
Before taking the picture, I manually focused the lens and set a fast shutter speed of 1/500sec on the camera so that the levitation subject won't be blur. The ISO was bumped to 3200 to enable the fast shutter speed.
The cons of the jump method for levitation photography is that you always need bright locations to keep your shutter speed fast. Flash will just spoil any photo unless you use speedlights. Furthermore, the pose of your levitation is very limited, you can't do many impossible levitation photographs by jumping.
So in conclusion, we definitely don't recommend this method and prefer the 3 photo method for Levitation Photography, we leave the jumping for Leisure Diving. Have fun!


 Okay now, how can Mooncake Festival be without mooncakes?
 This is our favorite type of mooncake that we buy every year. The salted egg yolk mooncake.
 Next we wanna introduce something different. This is not a mooncake, this is Teochew biscuit (潮州朥饼), the pickled mustard vegetable flavor.
 Although not a mooncake, the Teochew biscuit is a part of the mooncake festival too.
 You don't really see pickled mustard vegetable inside but the taste is there and this is delicious!
 In front of Jolly Elsa, this might look like a minotaur or a devil's horn or bull's horn.
  In Chinese this is called 菱角, in English is Water Caltrop. Don't be fooled by its appearance, water caltrop is a traditional food for Mid-Autumn/Mooncake Festival. Water caltrop is cultivated in China and harvested during the fall (autumn).
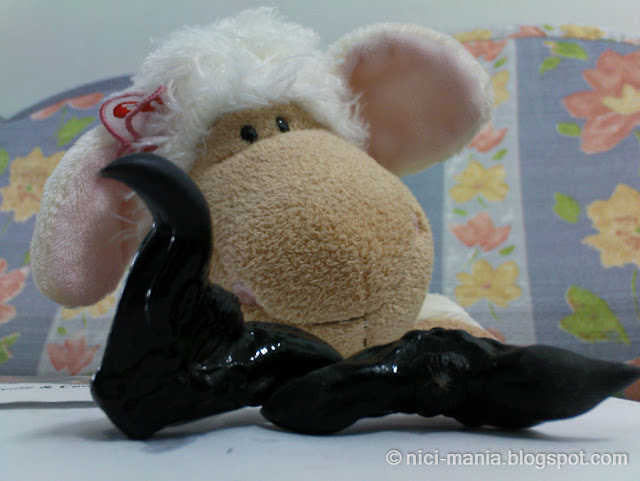 菱角 or Water Caltrop taste like water chestnut when boiled. The black shell is very hard, you have to crack it open like you crack a crab. Jolly Elsa finds it very amusing.
 Next, is a little Yam in front of Jolly Elsa. Yam is another traditional food for Mooncake Festival.
 Sweet pomelo is the grapefruit of the Chinese and another traditional food that we eat for Mooncake Festival. There you go, water caltrops plus yam plus sweet pomelo! These traditional food are used as offerings to the Moon Goddess during mooncake festival.